Data Moving SPA with a Context-Dependent Menu
The Data Moving Menu Control may be used to navigate among the virtual pages of a Single Page Application, too. In this step by step tutorial I will show you how to configure the menu control, and how to adapt it to the authorizations of the currently logged user .
The full working code is available in the “ContextDependentMenu” file on this site and on the Data Moving Plugin Examples Codeplex site download area. The Visual studio solution must be activated by installing the DataMovingPlugin5Examples.x.x.x.nupkg file you get with the product.
The result that you’ll obtain is shown in this Video:
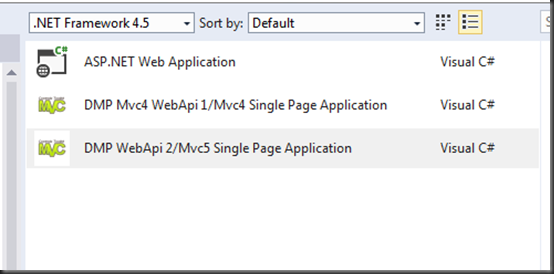
As a first step let select the SPA Mvc 5/WebApi 2 SPA project template in visual studio. All SPA visual studio templates may be downloaded from the Data Moving Examples Codeplex Site.
Select File->New->Project in VS 2013:
Then name the new project:, SPAMenuTutorial:
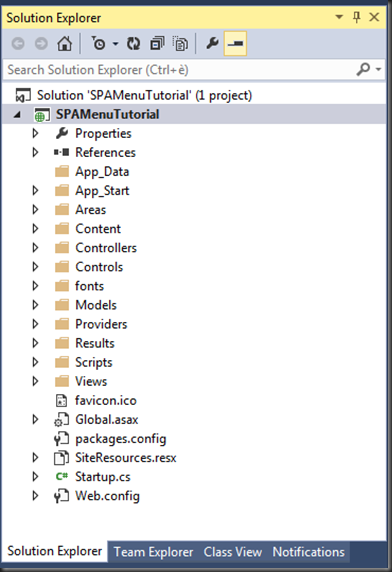
The result should be this one:
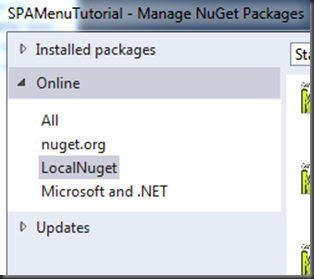
Now you need to install the Data Moving Plug-in for Mvc 5. Right click on the “References” and select: “Manage Nuget Packages…”:
In the window that appears, select the local Nuget source on your hard disk where you copied all Data Moving Plug-in Nuget packages:
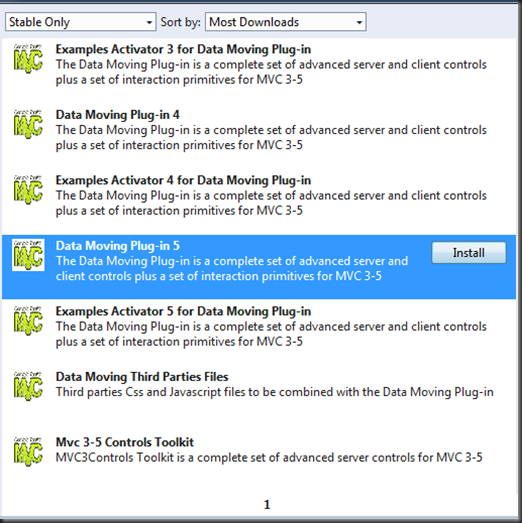
Now select the “Data Moving Plug-in 5”, and install it.
Before running the initial SPA that the visual studio template created for you, your Product Key must be placed in the application root Web.Config, in the AppSettings section:
- <appSettings>
- <add key="webpages:Version" value="3.0.0.0" />
- <add key="webpages:Enabled" value="false" />
- <add key="ClientValidationEnabled" value="true" />
- <add key="UnobtrusiveJavaScriptEnabled" value="true" />
- <add key="DMPDefaultStyle" value="Bootstrap" />
- <add key="DMPProductKey" value="P-ZzKk-****..........." />
- </appSettings>
Now you may run the project:
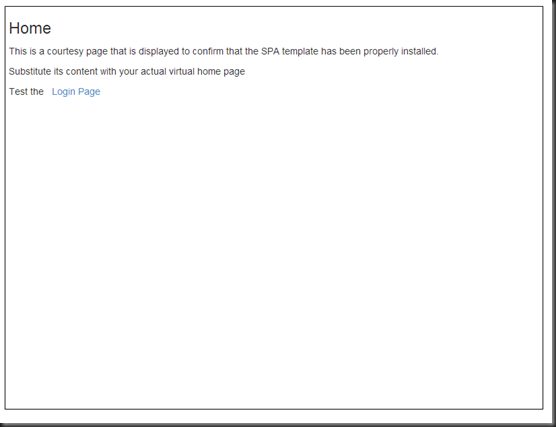
An essential SPA with just an home page, and Login, Logout, and Unauthorized page is created.
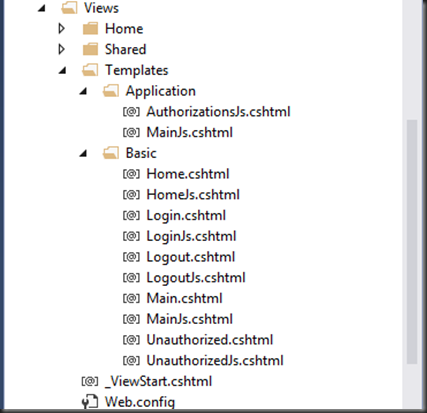
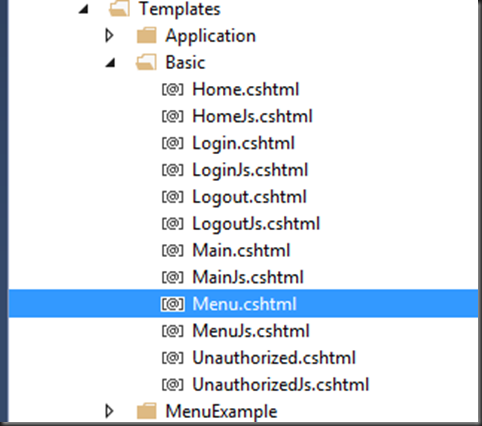
All these SpaViews are placed in the “Basic” SPA Module that is loaded as soon as the application starts:
The Application folder contains just two dynamic JavaScript files:
- Application/MainJs. It contains the SPA start-up code and the definition of the application ViewModel.
- Application/AuthorizationJs. This JavaScript file is called by the previous Application/MainJs file and contains all authorization rules for the application SPAViews. Initially the rule set is empty, and the file contains just a commented-out example that shows how to define a rule:
- @using MVCControlsToolkit.Controls
- <script>
- (function () {
- //Add here authorization rules for each virtual page
- //(rules may include also the page role)
- //as the one commented out below
- @*
- @(SPAAuthorizations.New().Claims("logged")
- .Roles("<role1>", "<role2>")
- .AddTo("<module name>", "<view name>",
- "<role name (optional)>"))
- *@
- })();
- </script>
All SPA templates use bootstrap for styling, and install a bootstrap Nuget package that provides just the “core” CSS without any specific theme. In order to improve, the appearance of our demo we may download the default bootstrap theme from the bootstrap web site: “bootstrap-theme.min.css “and “bootstrap-theme.css”. Just add these two files to the web site “Content” folder, and then add "~/Content/bootstrap-theme.css", to the "~/Content/css" style bundle definition in the App_Start/BundleConfig.cs file that contains all bundle definitions:
- bundles.Add(new StyleBundle("~/Content/css").Include(
- "~/Content/bootstrap.css",
- "~/Content/bootstrap-theme.css",// <-Add new file reference here
- "~/Content/MVCControlToolkit.ControlsExt.Mobi-" + version + ".min.css",
- "~/Content/Site.css"));
Without the addition of a theme the appearance of the menu we are going to build would be quite “bad”.
Our plan is:
- Defining some users and roles in the application security Database
- Defining a new SPA Module with 5 simple SPAViews
- Declaring 3 authorization rules that allow just users with the “admins” role to access SPAView 3, 4 and 5
- Defining a Menu to navigate our SPAViews
- Adapting the Menu to the current page and to the current logged user.
Defining the security Database
The Models/ApplicationDbContext.cs file contains a Database seeding function that defines the “admins” role and two users: an administrator and a normal user. In an actual application we should modify this code to adapt it to our needs. In this simple tutorial we may use the default users and roles.
The seeding function is “activated “ by a few lines of code in the Global.asax that are initially commented-out:
- protected void Application_Start()
- {
- ....
- ....
- ....
- //Uncomment to prepopulate db with sample users
- //See ApplicationDbContext.cs
- /*
- Database.SetInitializer
- <SPAMenuTutorial.Models.ApplicationDbContext>
- (new SPAMenuTutorial.Models.ApplicationDbContextInitializer());
- */
- }
Let uncomment them, and run the application. Now we may login as “admins” with the credentials:
username: admin, password: padmin, as shown in the previous video.
Defining a new SPA Module with 5 simple SPAViews
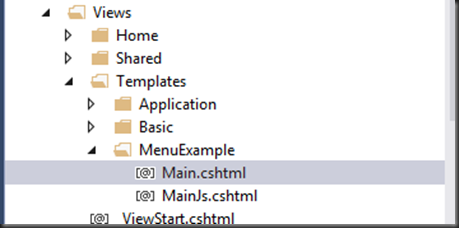
Now, in visual studio, right click on the Views/Templates folder and select “new folder”. Name the new folder: “MenuExample”.This folder will contain all files of the new MenuExample SPA Module that we are going to define.
Now, in visual studio right click on the “MenuExample” folder and select: “New Item”:
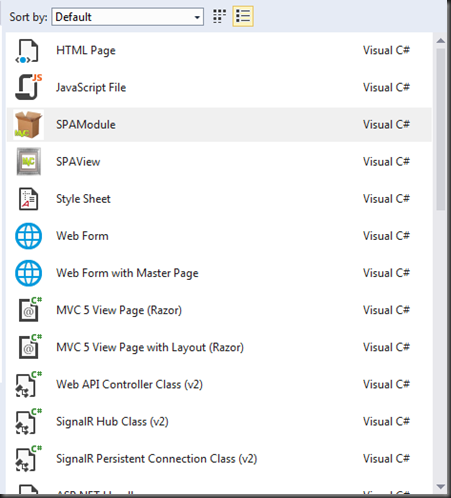
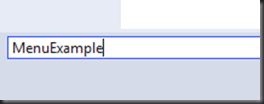
Select “SPAModule”, and then give to the new SPA module the same name of the previous folder: “MenuExample”:
We should get the following files structure:
The two Main and MainJs files contain the logic to assemble all SPAViews we are going to define into an unique SPAModule. More specifically, Main.cshtml contains the logic to assemble all templates, and to route any incoming View request to the right SPAView template, while MainJS.cshtml contains the logic to assemble the AMD code associated to all SPAViews into the unique JavaScript file associated to the whole “MenuExample” module, and the logic to route any SPAView request to the right chunck of JavaScript code that was previously aggregated to the “MenuExample” module.
Since ,as in most of the cases, we don’t need to modify the default routing rules you don’t need to modify Main, and MainJs.
Now we need to define the Action method that will deploy the “MenuExample” module to the client. Go to the “Controllers/TemplatesController.cs” file, copy the example “MyTemplate” action method…
…paste it, and rename any occurrence of “MyModule” into “MenuExample”:
- public ActionResult MenuExample(bool isJs)
- {
- string module = "MenuExample/Main";
- if (isJs) return this.MinifiedJavascriptResult(module + "Js");
- return PartialView(module);
- }
Now we may define all SPAViews.
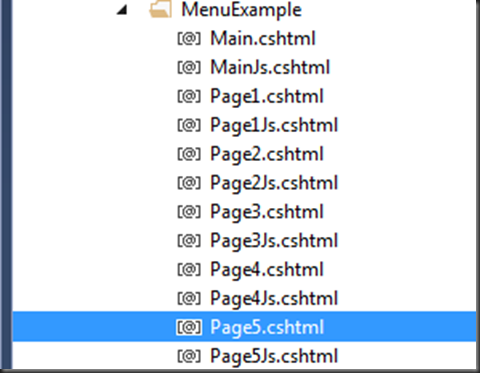
Right click on the “MenuExample” folder, and select again “New Item”. However this time, choose “SPAView”. Repeat the same operation five times, and give to the SPAViews the names:
“Page1”, “Page2”, “Page3”, “Page4”, and “Page5”:
Now open each Page1.cshtml…Page5.cshtml file:
- @*@model MyViewModel*@
- <divid="@Html.PrefixedId("pageRoot")"
- data-helper-prefix="@Html.PrefixedId("")">
- <h3 >@*View title if any*@</h3>
- </div>
Then add the “main-page” Css class and a different header to each page:
- @*@model MyViewModel*@
- <div class="main-page"id="@Html.PrefixedId("pageRoot")"
- data-helper-prefix="@Html.PrefixedId("")">
- <h3 >Page 1</h3>
- </div>
You don’t need to define a page ViewModel, since we will use all these pages just to test our menu.
Since pages have no ViewModel wee need to comment-out the instruction that prepare the SPAView JavaScript model in each PagexJs.cshtml file. In each PagexJs.cshtml file locate the instruction:
- vm.Content = ko.mapping.fromJS(viewModelContent);
and comment it out:
- mvcct.core.moduleResult(function (vm) {
- if (!vm._initialized) {
- vm._initialized = true;
- //vm.Content = ko.mapping.fromJS(viewModelContent);
Done! Now you may navigate to each of the newly created SPAViews, by adding view and module parameters to the root application url that Visual Studio automatically set in you browser:
http://localhost:3291/?module=MenuExample&view=Page1
Declaring the authorization rules
As already announced pages 3, 4, 5 must be available only for users with the role admins. Open the Views/Templates/Application/AuthorizationJs.cshtml file and add the three rules below:
- @using MVCControlsToolkit.Controls
- <script>
- (function () {
- //Add here authorization rules for each virtual page
- //(rules may include also the page role)
- //as the one commented out below
- @*
- @(SPAAuthorizations.New().Claims("logged")
- .Roles("<role1>", "<role2>")
- .AddTo("<module name>", "<view name>",
- "<role name (optional)>"))
- *@
- @(SPAAuthorizations.New().Claims("logged")
- .Roles("admins")
- .AddTo("MenuExample", "Page3"))
- @(SPAAuthorizations.New().Claims("logged")
- .Roles("admins")
- .AddTo("MenuExample", "Page4"))
- @(SPAAuthorizations.New().Claims("logged")
- .Roles("admins")
- .AddTo("MenuExample", "Page5"))
- })();
- </script>
In this simple example we specified access rules for each single SPAView, but in more complex applications you may write also something like: AddTo(“MenuExample”, “*”), in which case the requirements apply to all SpaViews of the “MenuExample” module. Then, exceptions to this general rule may be applied to specific SPAViews.
Now when you navigate, to Page3-5, the login form appears. Test it with Page4:
http://localhost:3291/?module=MenuExample&view=Page4
After you successfully login, Page4 appears.
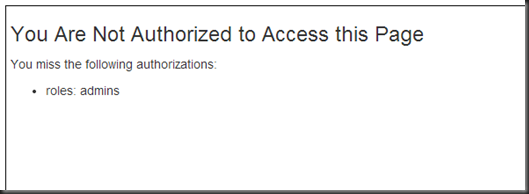
Now, try to login with username: normalUser. and password: pnormalUser; you will see the following complaint page:
Wow! We need only a “smart menu” to navigate our application.
Making Room for our Menu
All SPAViews are loaded in the Views/Home/Index.cshtml page. The code in the above page do the following:
- @{var h = Html.SendToClient(m => m, "applicationModel", "");}
Declares the application ViewModel, and get a client ViewModel aware HtmlHelper<ApplicationModel>, that is then used to declare the SPAViews hosts where all the SPAViews may be loaded:
- <div id="content">
- @h.ClientTreeIteratorFor(m => m.MainContent, null,
- "mainAfterRender",
- "mainBeforeRemove",
- wrapper: ExternalContainerType.div,
- wrapperAttributes: new{id = "main_host"}
- )
- </div>
Each SPAView host is bound to an applicationModel Property. The initial application ViewModel contains just a single property, called MainContent, used by the main content SPAView host, shown above. mainAfterRender and mainbeforeRemove are applicationModel methods defined in Views/Templates/Application.MainJs.cshtml, that provide respectively content fade-in and content fade-out.
Since we need a further SPAView host for our menu we must add a new property to the application ViewModel:
- public class ApplicationModel
- {
- //main virtual page host
- public baseViewModel<SampleClass> MainContent { get; set; }
- //add here further virtual page hosts
- //Main Menu Host
- public baseViewModel<SampleClass> MenuContent { get; set; }
- //initial page to load
- public externalSPALink InitialPage { get; set; }
- }
Now we may define our Main Menu host. We place it on top of the Main Content:
- <div id="content">
- @h.ClientTreeIteratorFor(m => m.MenuContent, null,
- wrapper: ExternalContainerType.nav,
- wrapperAttributes: new { id = "menu_host" }
- )
- @h.ClientTreeIteratorFor(m => m.MainContent, null,
- "mainAfterRender",
- "mainBeforeRemove",
- wrapper: ExternalContainerType.div,
- wrapperAttributes: new{id = "main_host"}
- )
- </div>
We enclose the our main menu in a nav tag to improve the application accessibility. The Main Menu host doesn’t need fade-in, and fade-out capability, since it will never be removed, but only modified to adapt it to the context.
We need some Css to align the menu with the main content. Open the Content/Site.css file and append:
- /*Menu*/
- #menu_host{
- width:800px;
- margin: 10px auto 10px auto;
- min-height: 50px;
- border: none;
- }
Defining a Menu to Navigate our SPAViews
We will add the “Menu” SpaView to Basic module that is loaded as soon as the application starts Right click on the Views/Templates/Basic folder and add a new SPAView called: “Menu”:
The Data Moving control suite urnish the default SimpleMenuItem class to be used as ViewModel for each menu item. We may decide to use it, inherit from it or to use a custom class. The definition of the SimpleMenuItemClass is:
- public class SimpleMenuItem
- {
- public string Text { get; set; }
- public string Link { get; set; }
- public string UniqueName { get; set; }
- public string Target { get; set; }
- public List<SimpleMenuItem> Children { get; set; }
- }
When the Menu works in a “standard” Mvc application the Link property contains either an Url or the name of a JavaScript function, preceeded either by @, or # to be executed when the menu item is clicked. Analogously the Target property contains the target where to open the Url.
In the case of a SPA we must supply a function that provides a custom interpretation of both Link and Target. In the simplest case a SPAView may be referenced with a string of the type <module name>.<view name> in the Link, while the host where to load the SPAView may be denotated by its index into an array of possible hosts.
Thus, for Instance, “MenuExample.Page4” denotes the SPAView “Page4” contained in the “MenuExample” module. If needed, the notation may be extended to include also possible roles of the SPAView, and also an input object to pass to the SPAView:
<module>.<view>.<optional role>#<optional json representation of the SPAView input>
In our simple example the custom Link+Target processing function will accept just the simple notation <module>.<view> plus standard Urls:
- vm.Content.virtualNavigation = function (action, target) {
- if (!action) return false;
- if (action.indexOf("/") == 0 ||
- action.indexOf("http") == 0 ) {
- if (target) window.open(action, target);
- else window.location.href = action;
- return;
- }
- var parts = action.split(".");
- var host = target ? parseInt(target) : 0;
- vm._interfaces.mainHosts[host](
- mvcct.ko.dynamicTemplates.defaultPageStore.get(
- new mvcct.ko.dynamicTemplates.virtualReference(
- parts[0], parts[1])));
- };
Standard Urls are processed first, otherwise we retrieve the SPAView specified in the action parameter from the default page store. The host where to place the SPAView is decided by interpreting the target argument as an index in the array of all application root hosts that is inserted in the _interfaces property of the Menu ViewModel.
The _interfaces property is copied in each SPAView from the interfaces property of the application ViewModel by default context rules that are run each time a SPAView is loaded. All context rules are defined in the file: Script/Modules/contextRules.js. Below the default context rule that provide to each SPAView all interfaces needed to interact with the application:
- mvcct.ko.dynamicTemplates.addContextRule(function (data, cb) {
- if (mvcct.ko.dynamicTemplates.isBaseViewModel(data)) {
- data._interfaces = applicationModel.interfaces;
- }
- return false;
- });
The interfaces property of the application ViewModel is defined in the Views/Templates/Application.MainJs.cshtml file. Below the default definition:
- @* Put here all instances of the interface implementations
- you need in the application *@
- @* They will be added to all ViewModel by the context rules*@
- applicationModel.interfaces = {};
- applicationModel.interfaces.uiBlock = new uiBlockInterface();
As a default the interfaces property contains just an implementation of the interface used to “block” the content of a DOM during a communication with the server. We must add also the array of all hosts (in our case there are just 2 hosts):
- @* Put here all instances of the interface implementations
- you need in the application *@
- @* They will be added to all ViewModel by the context rules*@
- applicationModel.interfaces = {};
- applicationModel.interfaces.uiBlock = new uiBlockInterface();
- applicationModel.interfaces.mainHosts =
- [applicationModel.MainContent, applicationModel.MenuContent];
In the same Views/Templates/Application.MainJs.cshtml file we must modify the code that loads the initial SPAViews:
- applicationModel.MainContent(
- mvcct.ko.dynamicTemplates.defaultPageStore.get(initLink ||
- new mvcct.ko.dynamicTemplates.virtualReference("Basic", "Home")));
…because we must load also our menu:
- applicationModel.MenuContent(
- new mvcct.ko.dynamicTemplates.baseViewModel("Basic", "Menu"));
- applicationModel.MainContent(
- mvcct.ko.dynamicTemplates.defaultPageStore.get(initLink ||
- new mvcct.ko.dynamicTemplates.virtualReference("Basic", "Home")));
The Menu SPAView is not handled by any page store, since it will never be removed from its host.
The vm.Content.virtualNavigation method definition may be placed immediately after the ViewModel initialization in the MenuJS.cshtml file:
- mvcct.core.moduleResult(function (vm) {
- if (!vm._initialized) {
- vm._initialized = true;
- vm.Content = ko.mapping.fromJS(viewModelContent);
- @* Initialization code executed only after View
- creation or View redirect *@
- vm.Content.virtualNavigation = function (action, target) {
- ...
- ...
Now we must define viewModelContent to bethe object hierachy that contains all Menu information.
Usually, the ViewModel content is initialized by serializing in JavaScript a .Net data structure, at the beginning of any …Js file:
- @*
- @Html.JavaScriptDefine("viewModelContent",
- new <dotnet viewModel here>())
- *@
In our case the .Net data structure is a hierarchy of SimpleMenuItem objects that we may build easily with the helper SimpleMenuBuilder class:
- <script>
- @{
- var menuItems = new SimpleMenuBuilder()
- .Add("Home", "Basic.Home")
- .Add("Page 1", "MenuExample.Page1")
- .Add("Page 2", "MenuExample.Page2")
- .Add("private area")
- .Down()
- .Add("Page 3", "MenuExample.Page3")
- .Add("Page 4", "MenuExample.Page4")
- .Add("Page 5", "MenuExample.Page5")
- .Up()
- .Add("External Links")
- .Down()
- .Add("Data Moving Controls",
- "http://www.mvc-controls.com")
- .Add("knockout.js",
- "http://knockoutjs.com/", null, "_blank")
- .Down()
- .Get();
- }
- (function () {
- @Html.JavaScriptDefine("viewModelContent",
- new SimpleMenuItem {Children=menuItems })
- ...
- ...
We added also two sub-items that navigate to external pages.
Now it’s finally time to use the Data Moving Menu control. Open the Menu.cshtml file, and substitute its content with:
- @model MVCControlsToolkit.Controls.SimpleMenuItem
- @{
- var builder = Html.ExtendedClientMenuFor(
- m => m.Children, m => m.Link,
- new { @class = "mainmenu" });
- if (HttpContext.Current.Request.Browser.IsMobileDevice)
- {
- builder = builder.ActiveOnlyOnClick();
- }
- builder.Target(m => m.Target)
- .Radiuses(0.5f, 1f, 0.5f)
- .TemplatesBaseName("Basic_MenuItem")
- .TemplateSelector(
- @"function(x){
- return (x.Children.peek() ?
- 'Basic_MenuItem1' : 'Basic_MenuItem0');
- }")
- .CustomNavigate("Content.virtualNavigation")
- .AddRowType()
- .StartColumn(m => m.Text)
- .CustomColumnClass(GenericCssClasses.NoWrap)
- .EndColumn()
- .EndRowType()
- .AddRowType()
- .StartColumn(m => m.Text)
- .CustomColumnClass(GenericCssClasses.NoWrap)
- .EndColumn()
- .ChildCollection(m => m.Children)
- .EndRowType();
- }
- @builder.Render()
The ExtendedClientMenuFor Html<T> extension declares the root menu items collection, the property that contains the level 0 menu items, and the menu data item property that contains the “action” to execute when the menu item is selected.Then, ExtendedClientMenuFor returns a fluent interface to continue the menu configuration. The root menu ul tag contains the mainmenu Css class that defines some <ul> and <li> structural properties:
{
padding: 0 0 0 0 !important;
font-size:1.2em;
}
ul.mainmenu > li
{
margin: 5px 7px 5px 7px !important;
}
ul.mainmenu ul {border: none; background-color:transparent; }
The above definitions must be appended to the Content/Site.css file. You may experiment by changing some of them.
As a default sub-menus appear when the mouse hover their father menu item, but If the client device is a mobile device the call to ActiveOnlyOnClick() change this behavior, and sub-menus are open on “click” or “tap”.
Then we declare which item property contains the target where to open links or virtual SPAView references, and the various menu items radiuses (see the picture that shows the three radiuses here ).
The way each menu item is rendered is defined by two templates, that are configured inside two AddRowType()-EndRowType() blocks. Both templates are based on the default menu row template, since no custom row template is defined, and both of them have an unique column that shows the menu item title. Each menu item title is contained in the Text property of the underlying data item. The addition of the GenericClasses.NoWrap Data Moving predefined Css class prevents menu item titles from wrapping. The only difference between the two templates is the ChildCollection call in the second declaration, that causes the recursive rendering o all children sub items contained in the children property. The two AddRowType blocks define two knockout client templates. Their names are obtained by adding the postfixes ‘0’ and ‘1’ to the template base name “Basic_MenuItem” declared with TemplateBaseName. It is good practice to give name of the type <module name>_<a name> to all client templates used by controls declared inside SPAViews.
The first template is used for the menu items that can’t have children (their Children property is a null observable) while the second template is used for the menu items that may have children (their Children property is a possibly empty observable array). The selection of the right template is performed by the template selection function declared with TemplateSelector. In our case the function is declared on line, but it may be also the name of a SPAView ViewModel method.
CustomNavigate declares the custom navigation function we have already defined in the MenuJs file.
That’s enough to see the menu working! Run the application and enjoy your first Data Moving SPA Menu!
Adapting the Menu to the Current Page and to the Current Logged User
Now, our last objective is adapting the menu to the logged user and to the actual SPAView that is in the main host. More specifically:
- Each time the user changes the menu must display just the items the new user has the right to access, that is: if all sub-menus of a father menu item are not visible and if the father menu item itself doesn’t connect to a SPAView the user may access, the father menu item must be invisible
- The menu item that connects to the actual SPAView that is in the main host must appear in a “selected state”.
Both requirements may be achieved by letting the content ViewModel of our menu implements an interface, say, IContextDependent with two methods:
- authorize(), that adapts the SPAView (our menu SPAView) to the authorizations of the current user.
- select(x), that informs the SPAView (our menu SPAView) that the SPAView x is currently in the main host. Where x is a string with the same format of the Link property of our menu data items.
In general we may handle several SPAViews that implements the IContextDependent interface in a modular way as follows:
- We define a IContextDependent resource handler with methods to register and unregister IContextDependent implementations for being properly handled by the application.
- Each time a SPAView that implements IContextDependent, is loaded it registers itself to the IContextDependent resource handler, and then it unregisters itself when it is unloaded.
- Whenever the current user changes, the IContextDependent resource handler is notified and calls the authorize() method of all registered IContextDependent implementations.
- Whenever the current SPAView in the main host changes the the IContextDependent resource handler is notified and calls the select(x) method of all registered IContextDependent implementations.
We may define the class that implements the IContextDependent resource handler in the Views/Templates/Application/MainJs.cshtml file next to the definition of the uiBlockInterface class:
- var iContextDependentHandler = function () {
- var registrations = [];
- this.register = function (x) {
- registrations.push(x);
- };
- this.unregister = function (x) {
- var index = -1;
- for (var i = 0; i < registrations.length; i++) {
- if (registrations[i] == x) {
- index = i;
- break;
- }
- }
- if (index > -1) {
- array.splice(index, 1);
- }
- };
- this.select = function (x) {
- for (var i = 0; i < registrations.length; i++) {
- var item = registrations[i];
- if (item.select) item.select(x);
- }
- };
- this.authorize = function () {
- for (var i = 0; i < registrations.length; i++) {
- var item = registrations[i];
- if (item.authorize) item.authorize();
- }
- }
- }
Then, we add an instance of this classes to the applicationModel.interfaces property, so that it is available within the applicationModel itself and to all SPAViews:
- applicationModel.interfaces.uiBlock = new uiBlockInterface();
- applicationModel.interfaces.mainHosts =
- [applicationModel.MainContent, applicationModel.MenuContent];
- applicationModel.interfaces.contextHandler = //<-add here
- new iContextDependentHandler();
The iContextDependent.select method must be called each time a new SPAView is placed in the application main host. Accordingly, it may be called in the main host mainAfterRender that is defined as an applicationModel method in the Views/Templates/Application/MainJs.cshtml file:
- applicationModel.mainAfterRender = function (x, y) {
- //start added code
- if (y && mvcct.ko.dynamicTemplates.isBaseViewModel(y))
- applicationModel.interfaces.contextHandler
- .select(y.module + '.' + y.view)
- else
- applicationModel.interfaces.contextHandler
- .select(null)
- //end added code
- $(mvcct.core.filterHtml(x)).fadeOut(0).fadeIn(400);
- };
The if checks that the module and view properties are actually defined, otherwise a null value passed to the select method simply de-selects any previously selected SPAView.
The iContextDependent.authorize method must be called each time the logged user changes. The instruction that initializes the authorization system in the Views/Templates/Application/MainJs.cshtml file accepts an array of observables, and functions that are automatically notified whenever the user changes. This is the right place for calling our authorize method:
- mvcct.ko.dynamicTemplates.enableAuthorizationManager(
- "@Url.Content("~/api/Account/CurrentUser")",
- "@Url.Content("~/api/Account/Logout")",
- function () {
- @* on logout *@
- },
- [applicationModel.MainContent,
- applicationModel.interfaces.contextHandler.authorize//<-add here
- ] @*all observables to refresh when the user changes*@
- );
iContextDependent.register and iContextDependent.unregister must be called in the Views/Templates/Basic/MenuJs.cshtml JavaScript file associated with our Menu SPAView.
The right place to call iContextDependent.register is the processInput method that is called each time a SPAView is loaded, while the right place to call iContextDependent.unregister is the beforeRemove method that is called before the SPAView is unloaded:
- vm.processInput = function (nodes) {
- @* Code here is executed each time the page is loaded.
- Virtual page inputData must be processed here *@
- vm._interfaces.contextHandler.register(vm.Content);
- modifyDomOnLoad(vm, nodes);
- };
- vm.beforeRemove = function () {
- @* Insert here clean up code to be executed
- when the page is unloaded*@
- vm._interfaces.contextHandler.unregister(vm.Content);
- cleanupDomOnUnload(vm);
- };
Now our vm.Content ViewModel must implement the IContextDependent interface. You may place the interface definition immediately after the vm.Content.virtualNavigation method we defined before:
- var currentSelected = null;
- vm.Content.select = function (action) {
- if (!action) {
- currentSelected = null;
- if (currentSelected)
- mvcct.html.menu.selected(currentSelected, false);
- return;
- }
- var res =
- selectMenu(
- ko.utils.unwrapObservable(vm.Content.Children),
- action);
- if (!res && currentSelected)
- mvcct.html.menu.selected(currentSelected, false);
- currentSelected = res;
- };
- vm.Content.authorize = function () {
- authorizeMenu(
- mvcct.ko.dynamicTemplates.authorizationManager(),
- vm.Content.Children);
- }
- vm.Content.authorize();
Both methods call two private recursive functions that traverse the menu data items hierarchy to do their job.
The currentSelected private variable contains the menu data item that is currently selected, if any, otherwise, null. If a null action is passed, currentSelected is set to null and any previously selected menu item is unselected by calling mvcct.html.menu.selected(currentSelected, false).
Otherwise the recusive selectMenu function tries to locate a menu data item matching the action string. If such a data item is found the menu item it is bound to is set in the selected state by calling: mvcct.html.menu.selected(item, true) and the data item itself is returned in the res variable, so it may substitute the previous currentSelected. If the selectMenu recursive search fails, null is returned in res, and any previously selected item is unselected by calling mvcct.html.menu.selected(currentSelected, false).
The authorize method immediately calls the recursive private function authorizeMenu passing it the current authorization manager, and the level 0 menu data items. The authorizeMenu function traverses the menu data items hierarchy and checks possible links to SPAView against the authorization manager to verify if the SPAView may be accessed by the current user. In case the SPAView referred by a menu data item cannot be accessed by the user, the data item rendering is prevented by setting its _destroy property to true. If a menu item x has the only purpose of showing its children sub-items, and if all its children have _destroy set to true also the _destroy property of x is set to true, since it is completely un-useful.
The private functions selectMenu and authorizeMenu may be placed in the read-only private members area immediately before the mvcct.core.moduleResult call:
- @*Insert private functions and private readonly variables here*@
- function selectMenu(children, action, target) {
- for (var i = 0; i < children.length; i++) {
- var item = children[i];
- if (action == ko.utils.unwrapObservable(item.Link) &&
- (!target ||
- target ==
- (ko.utils.unwrapObservable(item.Target) || "0"))) {
- mvcct.html.menu.selected(item, true);
- return item;
- }
- var iChildren = ko.utils.unwrapObservable(item.Children);
- if (iChildren) {
- var child = selectMenu(iChildren, action, target);
- if (child) return child;
- }
- }
- return false;
- }
- function authorizeMenu(authorizationManager, obsChildren) {
- var children = ko.utils.unwrapObservable(obsChildren);
- if (!children || children.length == 0) return false;
- var hasChildren = false;
- var aChange = false;
- for (var i = 0; i < children.length; i++) {
- var item = children[i];
- var action = ko.utils.unwrapObservable(item.Link);
- var virtualLink = action &&
- action.charAt(0) != '#' &&
- action.charAt(0) != '@@' &&
- action.charAt(0) != '/' &&
- action.indexOf("http") != 0 &&
- action.indexOf("mailto") != 0;
- var authorized = false;
- if (virtualLink) {
- var parts = action.split('.');
- authorized =
- !authorizationManager.verifyAuthorization(
- new mvcct.ko.dynamicTemplates
- .virtualReference(parts[0], parts[1])
- );
- }
- else authorized = action;
- authorized = authorized || false;
- if (authorized) authorized = true;
- var childrenAuthorized =
- authorizeMenu(authorizationManager, item.Children);
- authorized = authorized || childrenAuthorized;
- if ((item._destroy || false) != !authorized) {
- item._destroy = !authorized;
- aChange = true;
- if (item._destroy) mvcct.ko.unfreeze(item);
- }
- if (authorized) hasChildren = true;
- }
- if (aChange) obsChildren.valueHasMutated();
- return hasChildren;
- }
- @*End of private area*@
- mvcct.core.moduleResult(function (vm) {
- ...
- ...
- ...
It is worth to point out that each time we make invisible a menu item we call the mvcct.ko.unfreeze to release any possible cached template, since most of Data Moving controls cache templates to improve performance.
Now the context dependent menu is ready. Whenever you navigate to a SPAView that is referenced in a menu item that menu item will become visible and will appear in a selected state:
When a menu item get the focus the focus style overrides its “selected color” (this is due to the way bootstrap handles the focus style), if you don’t like this behavior you may change it by appending the following Css rule to the Site.css file:
- .mvcct-menu-item-selected:focus{
- background-color: #d9edf7 !important;
- border:2px solid yellow !important;
- }
Where background-color must match “selected color” that in the case of bootstrap is the “alert-info” Css class background-color.
If a permanently opened sub-menu is not acceptable in your application, you may customize the Css class that is added to all menu items on the path to the selected item by calling the ItemSelection method of the menu fluent interface. In the example below, a yellow border is added to all items on the path to the selected item instead of leaving them permanently in the opened state:
- @model MVCControlsToolkit.Controls.SimpleMenuItem
- @{
- var builder = Html.ExtendedClientMenuFor(
- m => m.Children, m => m.Link,
- new { @class = "mainmenu" });
- if (HttpContext.Current.Request.Browser.IsMobileDevice)
- {
- builder = builder.ActiveOnlyOnClick();
- }
- builder.Target(m => m.Target)
- .Radiuses(0.5f, 1f, 0.5f)
- .ItemSelection(structurePathSelectClass: "light-select")//<-
- .TemplatesBaseName("Basic_MenuItem")
- .TemplateSelector(
- @"function(x){
- return (x.Children.peek() ?
- 'Basic_MenuItem1' : 'Basic_MenuItem0');
- }")
- .CustomNavigate("Content.virtualNavigation")
- .AddRowType()
- .StartColumn(m => m.Text)
- .CustomColumnClass(GenericCssClasses.NoWrap)
- .EndColumn()
- .EndRowType()
- .AddRowType()
- .StartColumn(m => m.Text)
- .CustomColumnClass(GenericCssClasses.NoWrap)
- .EndColumn()
- .ChildCollection(m => m.Children)
- .EndRowType();
- }
- @builder.Render()
- .light-select{
- border:2px solid yellow !important;
- }
In this case the “selected color” on the menu item linking to “Page 4” becomes visible only if you hover the yellow-border “private area”.
You may also add a breadcrumb and modify the menu select method to update the breadcrumb, too.
That’s all for now! The full code is available in the “ContextDependentMenu” file of the Data Moving Plugin Examples Codeplex site download area. The Visual studio solution must be activated by installing the DataMovingPlugin5Examples.x.x.x.nupkg file you get with the product.
Francesco

